The WordPress toolkit is your one-stop-shop for all of your WordPress management tasks. With this powerful tool, you can easily install, update and manage not only your WordPress Core installation, but also all related plugins and themes.
Features:
- WordPress Simplified - One-click installer to initialize and configure WordPress from start to finish. One dashboard to mass-manage multiple WordPress instances.
- Stage and Test - Test new features and ideas in a sandbox before pushing them to production – No plugins required, no separate server needed.
- Cut Out Complexity - Stage, Clone, Sync, Update, Migrate and other complex tasks executed with one click.
- Secure Against Attacks - Hardens your site by default, further enhanced with the Toolkit’s security scanner. No security expertise necessary.
- Run and Automate - Singularly or mass-execute updates to the WP core, themes or plugins.
Configuration & Management
To access your WordPress toolkit, simply log in to your Gate.com Server Manager and navigate to the WordPress section on the left sidebar.Should you require detailed instructions on how to log in, you may visit the "How Do I Access My Gate.com Server Manager" article.
Within the WordPress section, you will be greeted by the following screen.
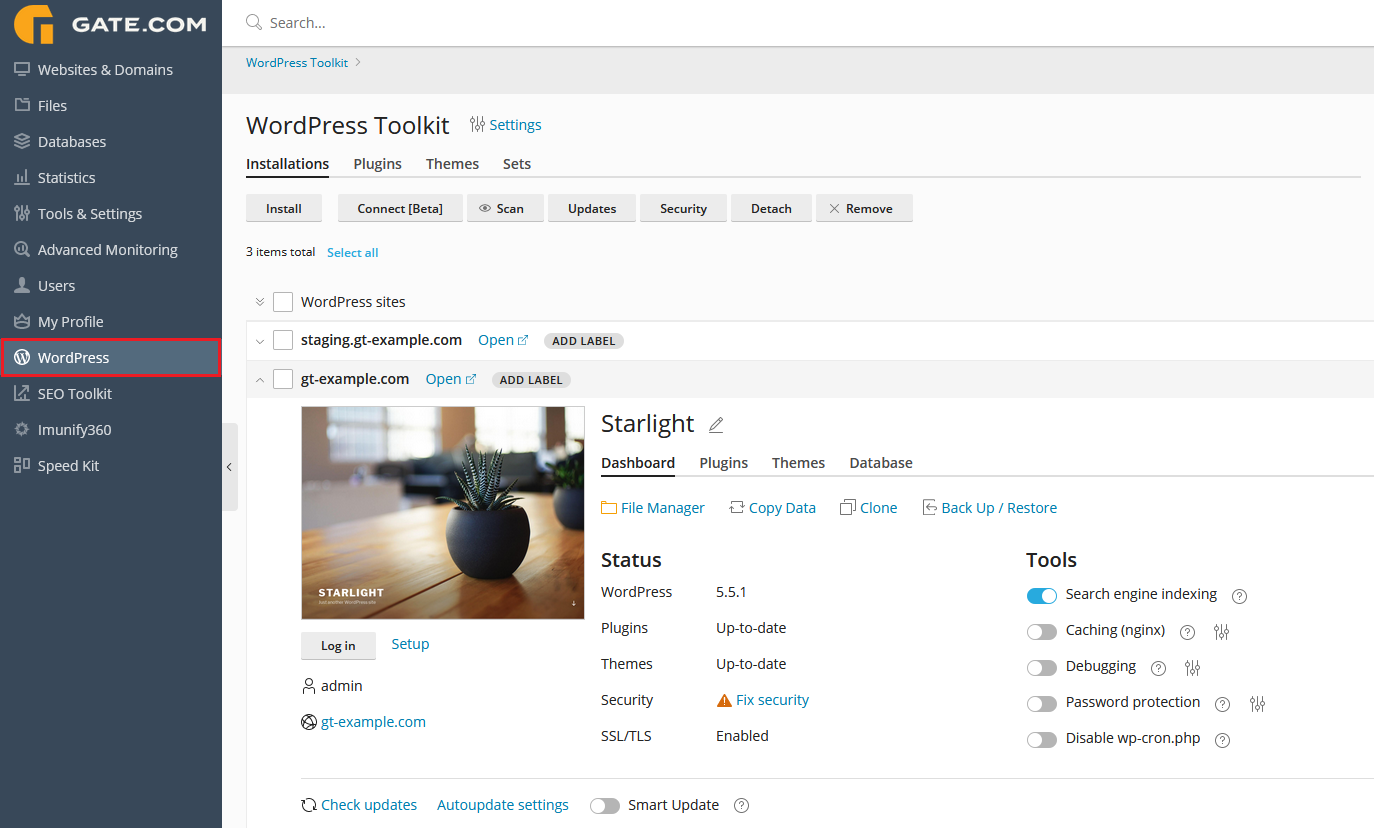
This is your WordPress toolkit. Let's take a closer look at the individual options, starting with the upper toolbar.
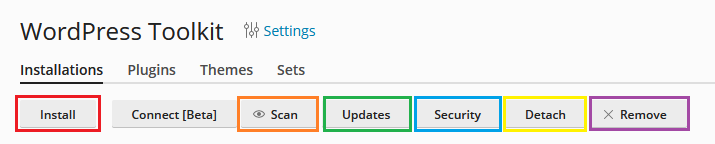
Under the Installation sub-section we have:
Install - from here, you can install a new instance of WordPress. A database will be automatically created during the installation and the connection string to it will also be applied. Note: Keep in mind that the additional tools and features that come with your subscription (e.g. Smart Updates, Speed Kit, SEO Toolkit etc.) are licensed for 1 domain. You can install as many WordPress instances as you wish, yet you can only have these additional features active for one at a time.
Scan - you can use this option, when you've manually installed/migrated a WordPress website without using the WordPress toolkit installation feature. By clicking on it, the toolkit will search for a WordPress installation on the server and if located, it will then be manageable from the toolkit itself.
Updates - from this section, you can check for and deploy updates for your WordPress core, plugins and themes. Note: it is recommended to have Smart Updates enabled, before applying updates, as it will make sure that they are tested on a staging environment, before applying them to your production site, thus reducing the chance of anything breaking. Smart Updates can be turned on by simply clicking on its slider within your WordPress toolkit dashboard. Should you require detailed instuctions and overview of Smart Updates, please visit the "Smart Updates - Overview & Configuration" article.
Security - this section takes care of your website/server security. From here you may apply security directives such as blocking bots, blocking execution of PHP code in specific folders etc. No coding or security expertise is required as the tool will give you suggestions on how to improve your security, offer a comprehensive summary of what each directive will do and apply the necessary code automatically to execute said directives.
Detach - this option will remove the selected WordPress instance from your WordPress toolkit. Note: This will not delete the installation. If you wish to re-enable it for management after having it detached, simply click on "Scan".
Remove - this will delete the selected WordPress instance and all of its related files and databases. Caution: only use this option after you have backed up your website or are sure that you do not need it.
Moving on to the Plugins sub-section:
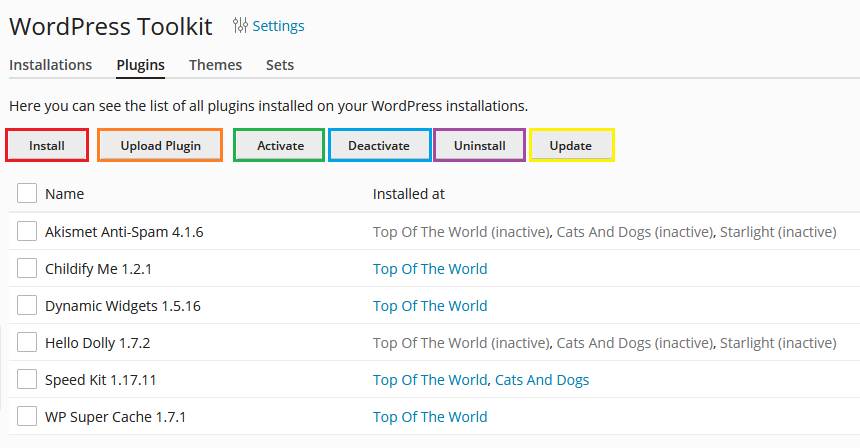
Install - lets you browser for and install new plugins. We recommend installing and updating plugins/themes from the WordPress toolkit, as opossed to doing it from the WordPress Admin dashboard.
Upload Plugin - from here you can upload plugin files directly from your local storage. Recommended for advanced users only.
Activate - lets you activate selected plugins. All changes will sync with your WordPress Admin Dashboard.
Deactivate - lets you deactivate selected plugins. Mainly used when a plugin is causing problems. All changes will sync with your WordPress Admin Dashboard.
Uninstall - lets you delete selected plugins.
Update - lets you check for and deploy updates to your plugins. Note: it is recommended to have Smart Updates enabled, before applying updates, as it will make sure that they are tested on a staging environment, before applying them to your production site, thus reducing the chance of anything breaking. Smart Updates can be turned on by simply clicking on its slider within your WordPress toolkit dashboard. Should you require detailed instructions and overview of Smart Updates, please visit the "Smart Updates - Overview & Configuration" article.
Similarly to the Plugins one, the Themes sub-section offers the following options:
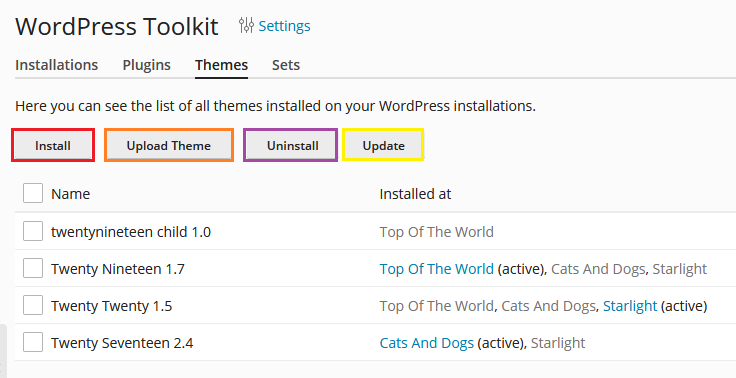
Install - lets you browser for and install new themes. We recommend installing and updating plugins/themes from the WordPress toolkit, as opossed to doing it from the WordPress Admin dashboard.
Upload Theme - from here you can upload theme files directly from your local storage. Recommended for advanced users only.
Uninstall - lets you delete selected themes. Note: make sure that the theme you're deleting is not the one in use by your WordPress.
Update - lets you check for and deploy updates to your themes. Note: it is recommended to have Smart Updates enabled, before applying updates, as it will make sure that they are tested on a staging environment, before applying them to your production site, thus reducing the chance of anything breaking. Smart Updates can be turned on by simply clicking on its slider within your WordPress toolkit dashboard. Should you require detailed instructions and overview of Smart Updates, please visit the "Smart Updates - Overview & Configuration" article.
Activate - lets you activate the selected theme. Upon activating a new theme, the current one in use by the website will automatically be deactivated.
Next, the Sets sub-section lets you create your own bundles of favorite plugins and themes to easily bulk-deploy onto new WordPress instances.
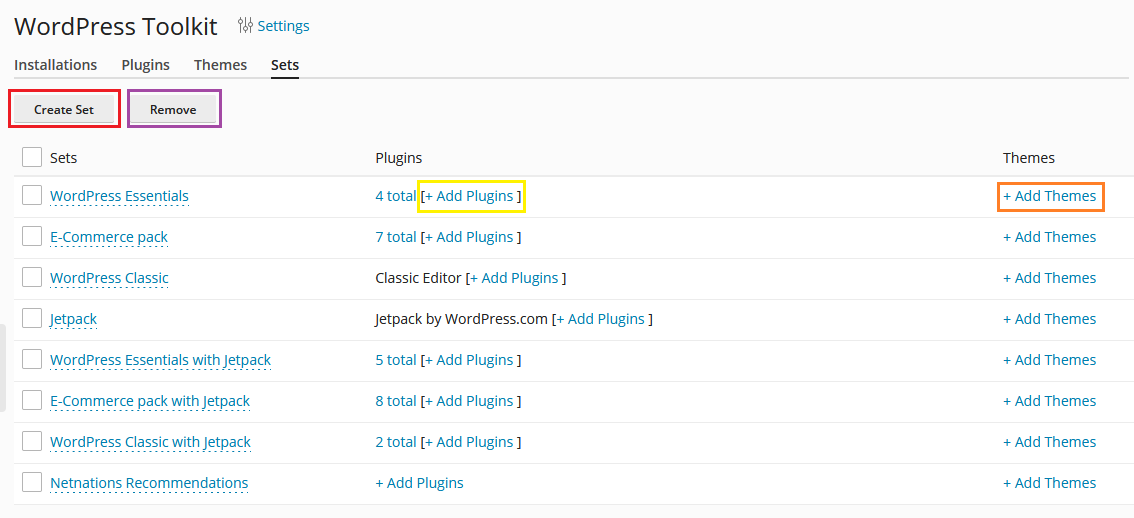
Create Set - lets you create a new set to add plugins and themes to.
Remove - deletes the selected set.
Add Plugins - lets you add plugins to an already existing set.
Add Themes - lets you add themes to an already existing set.
Now that we've covered the sub-sections, lets take a quick look at your main dashboard's quick access tools:
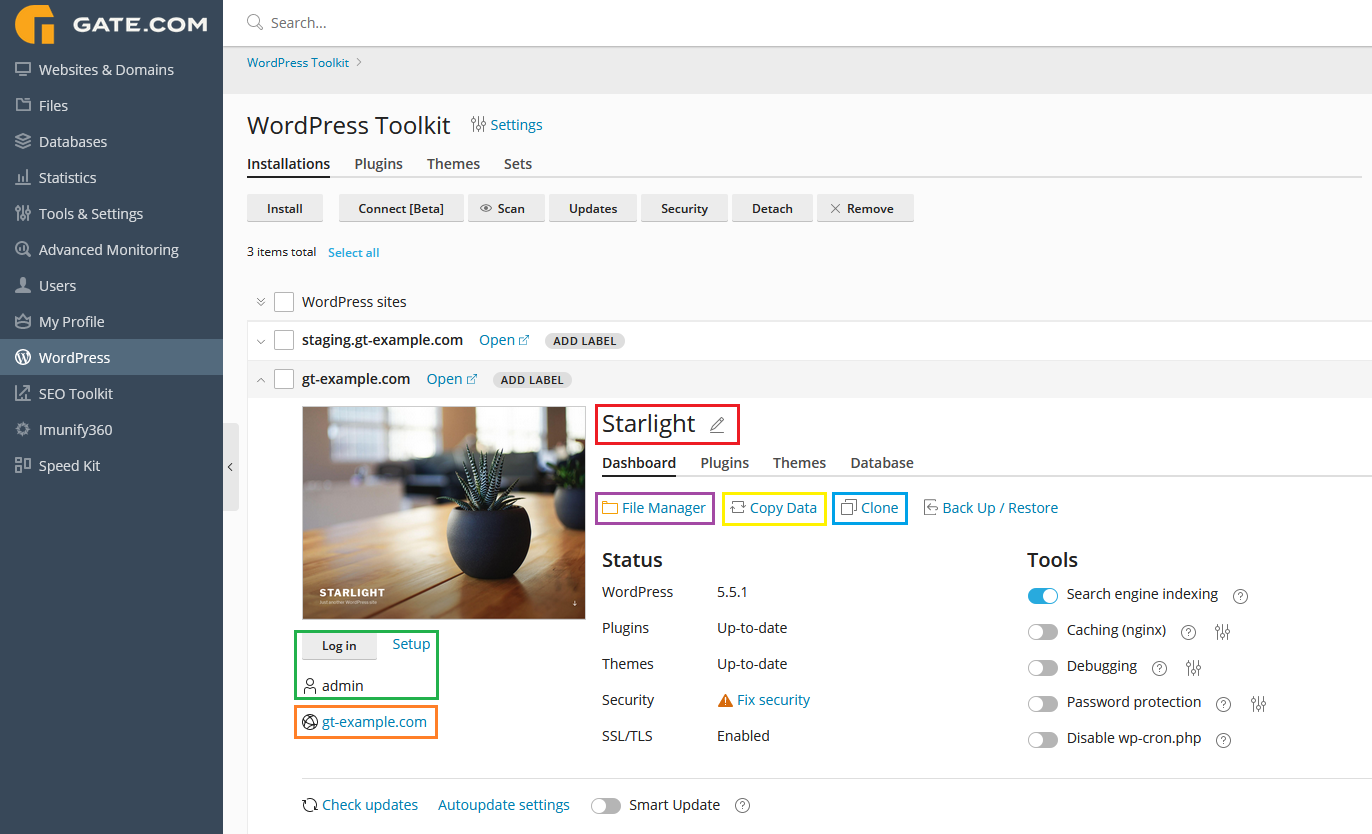
Website Title section - by clicking on the pencil, you can change your website's title (it is usually displayed in your browser tab)
Administrator section - by clicking on Log In, you will be automatically logged into your WordPress Admin Dashboard. Selecting Change will let you view and update your admin user info (password, e-mail address etc.)
Domain section - by clicking on your domain name, you will be brought to the Websites & Domains section of your Gate.com Server Manager for the specific domain.
File Manager - this option will bring you to our built-in online FTP File Manager.
Copy Data - this option will let you create an exact copy of your website on the same hosting space.
Clone - this option will let you create a clone of your website. You can either use a 3rd level domain (e.g. staging.example.com) or if you have added another domain prior, you may clone your current site under a new domain name. Note:if you're going to be cloning your site for staging or other purposes, we recommend you contact our Support team to make sure that all database entries of your original domain have been amended to reflect the new one.
Lastly, lets have a quick look at the available sliders at the bottom.
Search Engine Indexing - If your website is not yet ready for public viewing, disable this option to make sure that search engines do not show your website in the list of search results. Disabling this option enables the "Discourage search engines from indexing this site" option in WordPress, which, in turn, adds the "noindex, nofollow" tags to your website's header and adds the Disallow directive to the virtual robots.txt file For a staging website, you may want to have this turned off and vice versa for a production one.
Caching (nginx) - enable nginx-based caching for your website to significantly improve its performance and loading times. Cache settings are already optimized by default, but you can change them at any time on the Apache & nginx Settings page of the corresponding domain.
Maintenance mode - when a WordPress website enters maintenance mode, the website's content is hidden from visitors without being changed or otherwise affected. Visitors accessing your website when it is in maintenance mode see the maintenance screen instead of the website content. Your WordPress website enters maintenance mode automatically when you are updating your WordPress website or copying data between WordPress websites via WordPress Toolkit. If you are making changes to your website and want to temporarily hide it from visitors, you can manually put it into maintenance mode.
Debugging - If you are creating an installation for testing or development, you may want to enable one or more debug options in WordPress. Debug is disabled by default.
Smart Updates - Smart Update is a feature that allows users to test the update of their website, its plugins, and its themes, without actually affecting the website. Smart Update creates a full clone of the website, runs a number of preliminary checks, updates the cloned website, and runs the checks again to see if the update has broken anything. The resulting data is made available to the website owner in the WordPress Toolkit UI, along with a number of before-and-after screenshots for additional visual comparison. The user can then make an educated decision about whether the update should be performed or not, and tell the system to either perform the update on the production website, or discard the update.
Disable wp-cron.php - WordPress uses its wp-cron.php file for running routine tasks like checking for updates, sending email notifications, and so on. The file is executed every time site visitor loads a page, which can be an issue if there are critical tasks that must run on time. This option will disable the default wp-cron.php execution, creating a regular scheduled task instead.
